Thank you Jenny for guest posting today! I love tall cake stands and pretty food display so these dessert towers are calling my name!
Tutorial: Dessert Towers from Thrift Store Plates
Hello lovely readers. My name is Jenny and I am coming over from my blog, A Bird In The Hand Art. I starting blogging earlier this year in an attempt to get my creative juices flowing, as well as connect with the larger creative community. I enjoy writing about my adventures in crafting, cooking, and using thrift store finds in home decorating.
Today I wanted to share a fun way to create unique dessert stands. I don’t know about you, but I love the look of a multi-tier dessert tower. But why pay for a store bought one when you can make your own!
Dessert Tower Tutorial
Step 1: Find the plates! I usually start by wandering the plate aisle at my local thrift store and see what inspires me. One option is to find matching plates in different sizes. For this one, I decided to branch out and found several pieces that looked nice together, without exactly matching. And the fun part is you can make it as tall or as short as you like. I started with two plates and have now moved on to four. Yikes!
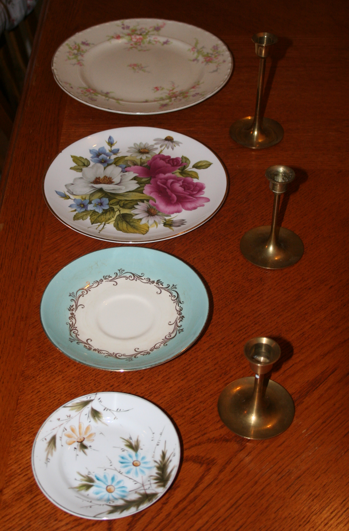
Step 2: Find your connectors. This is the part that will help you build up your tower. I recommend just wandering the housewares and seeing what you find. Think about what would look good and don’t be afraid to try random things. It may look really good! For this piece, I chose three candlesticks in varying heights.

Step Three: Mix up your adhesive. I used Epoxy for this step. I’m not a glue expert, but my husband gave this to me and it has held up well. You can find Epoxy at the hardware store. The kind I used came in two conjoined syringes. You just squeeze out an equal amount of both liquids and mix together (I used toothpicks for this). Once the liquids mix, a chemical reaction occurs which begins to harden the epoxy. That means after this step, you need to work quickly!

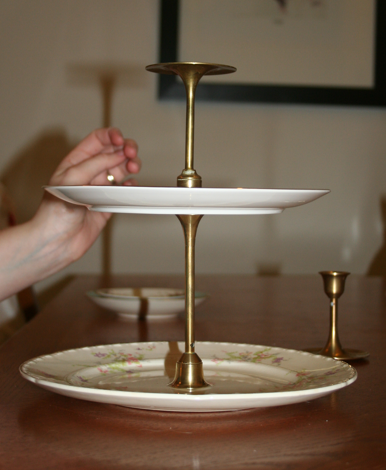
Step 4: Apply adhesive and build tower. Working quickly and carefully, begin to assemble your tower. I’m the kind of crafter that likes to “wing it,” but you are more than welcome to measure things out first and mark your placement (see here for tips on how to find the center of a circle). I typically begin building from the bottom to the top; it’s easier for me to place objects down onto the adhesive than the other way around. It can be helpful to ask someone to help you with this step so that you can check the straightness from multiple angles. But keep in mind; some pieces will be irregular and you may not always get a perfectly straight product. That’s okay! It shows it’s an original piece of art.
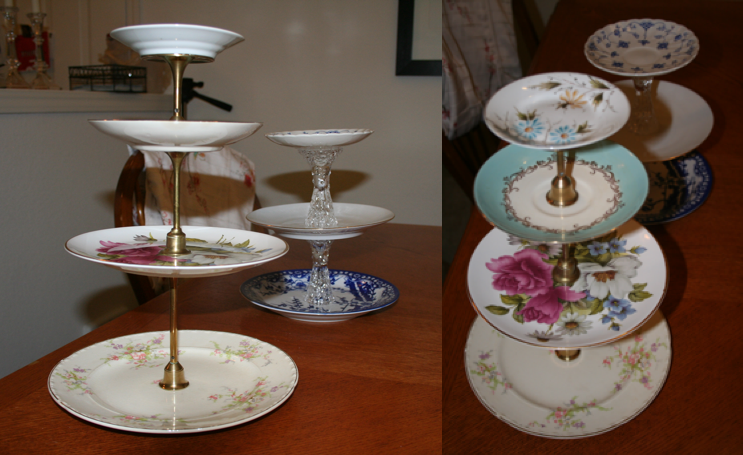
 Step 5: Admire and let dry. The epoxy I used takes five minutes to set and 24 hours to fully harden. Once it dries you are good to go. I don’t recommend putting these in the dishwasher, but they hold up well to hand-washing. Here are some pictures of the final product, as well as some other examples.
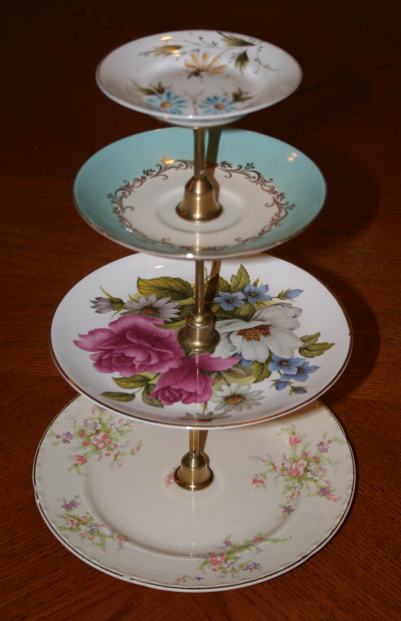
Its is the prettiest and smartest thing I ever seen… Oh now I am in thinking process that how I can also do it… very lovely and practical project … Thanks a lot lot for sharing …
Hope you would like to feel the beauty and fragrance of flowers at
http://craftaworld.blogspot.com/
Love
Farah
I’ve made these before and love everyone of them. Just to let you know E-6000 is an excellent adhesive that works much easier than the epoxy!
sunshinequeen.wordpress.com
just what I was looking for. thanks so much for this 🙂